Make your Snug Wrap Cloth Diaper Cover Front Snapping
Pattern: Very Baby Snug Wrap Diaper Cover pattern
You’re going to follow the pattern directions completely except you will omit the step where you sew on your front loop Aplix® prior to sewing on fold-over elastic binding. Also skip the last step of sewing on the Aplix® hook and foldback laundry tabs to the wings.
I did not make reinforcements and it held up just fine (snaps through PUL and outer print) but if you are sewing them to sell, I’d recommend you do the wing facings. (I know, wing facings are so much fun).
Step One: Using the following templates as a guide, mark your snaps on the inside of your cover.
Medium template (has info for size large too)
Newborn template (has info for size small too)
The templates have directions for figuring your Small and Large Covers too. It’s really simple.
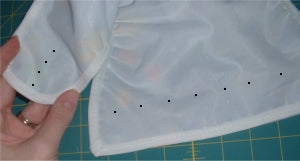
Step Two: Apply your wing snaps. Make sure you get the first cap/socket as close to the edge as you can. This helps reduce wing curl when the cover is on. Using a thinner fold-over elastic helps too. The caps go on the outside, and the studs go on the inside. You can apply crossover snap settings by applying caps to the inside and sockets to the outside in between the cap/studs on one wing.

Step Three: Apply your front panel snaps. I like to start in the middle and work my way out, smoothing fabric as I go. The PUL is slippery and the print slides around a bit, so go slow and make sure you’re getting your snaps as straight as you can. Caps go on the inside, sockets go on the outside.

All Done!: Wasn’t that easy?

