Sew a Wool Diaper Cover
I'm using two layers of felted wool jersey in this tutorial. It's actually a nice avacado green but it looks pretty pukey in the pictures! You can also make a Fleece cover the same way.
Step One: Add 1/4? seam allowance all around the entire pattern and cut two layers with the stretch going from side to side.

Step Two: Put right sides together (if you can tell with your wool, I couldn't) and then with a medium straight stitch, start at one corner of the front panel and stitch all around leaving the straight front panel open.
Tip: Don't stitch all the way to the edge of the open front panel. Leave some room so you can turn it under when it's right side out. You can also use the method in the Very Basic AIO pattern to stitch a little across the front panel on either corner before turning right side out. In this photo you can see the two layers are straight stitched together. At this point, lay your pattern piece on the wool body layers again and mark your elastic anchor points in the seam allowance.

Step Three: Use a zig zag stitch to sew the elastic in the seam allowance, stretching while you sew to the next anchor point. Pull gently if you do not plan on sewing casings. I wanted casings, so I pulled the elastic fairly tight.
Some like to use clear elastic with wool to reduce the chances of the elastic absorbing any urine and causing odor before washing is necessary. I haven't noticed this so I use polybraid, my favorite.
Here it is with the elastic sewn in. To get nice, even wings we're going to trim off the excess seam allowance…

Step Four: Trim excess seam allowance. Be careful not to clip through your stitching! I trim around the wings and down the sides of the front panel.

Step Five: Turning and topstitching is a difficult method to nail perfectly. You can often end up with uneven wings. To help combat this, compare your wings before you turn the cover right side out. If one is bigger or crooked, stitch a new curve until they are the same and trim off the excess. Be careful that you don't sew off too much or your wings will end up too short!
My wings aren't perfect here, but it's nearly 2 a.m. and I'm too tired to spend time perfecting them.

Step Six: Here's the "turning" part of the Turning and Topstitching method (also called "Stitching and Turning"). Using that open front panel, turn your cover right side out. Use your fingers to coax the wings and edges of the front panel all the way out. Fold the edges of the front panel inward and stitch closed.
Step Seven: You could be finished at this point, but I like to topstitch to keep the cover from trying to turn itself right side out again. Line your presser foot up with the edge of the cover and move your needle over to the right if your machine lets you (I like to get the stitching as close to the edge as possible). Stitch all around the cover – going around the elastic in the waist and legs to create casings.

Step Eight: Now it's time for closures. You can just follow the pattern directions to add hook and loop at this point, or continue following along with me to add snaps.
First eye your wing curves. You're going to place two cap/studs on each wing end. I don't have an exact method for finding this placement, I like to put the top snap in the forward edge of the curve and the lower snap a little farther back (so they aren't exactly vertical to each other – more on a slight diagonal).
Next, find the center of your cover by folding the front panel in half. Insert a pin to mark the center. Measure about 1.5 inches down (or feel for where your turned edges end and use that as a guide) and place two snaps an inch apart with the pin in the center. Caps on the inside, sockets on the outside. Continue placing snaps 1 inch apart across the top working out from the center.
Then, use your wing snaps to locate the lower row. The lower snaps are going to be placed in between the top snaps to make a "V".
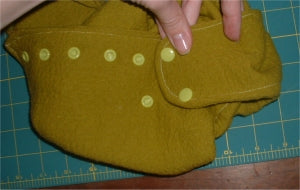
Here are both rows of snaps in. You'll want to get yours in a straight row unlike mine ;o)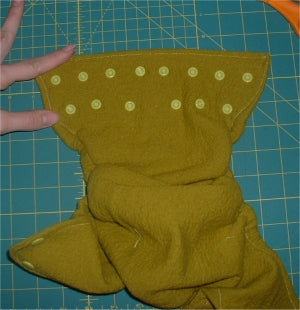
Ta Dah! I really like the way this looks. I think crossover snaps would look a bit messy, so I left them off. Isn't it a pretty little cover? You could do a lot with this – add an applique to one layer before sewing, or even add a snap in contour diaper to make it a Wool in One.

